September 2010 and beyond
Sadly, with the economy and other issues, we still are not able to go out on a rove. We will be back as soon as we get everything worked out. See you all soon! Happy Contesting —
Jim K3LFO
Sadly, with the economy and other issues, we still are not able to go out on a rove. We will be back as soon as we get everything worked out. See you all soon! Happy Contesting —
Jim K3LFO
After completing the September 2009 VHF contest with only minor damages to the RV and some engine issues developing, I attempted to participate in the 2 meter fall sprint. I went and raised the antennas and when I went to turn the rotor it failed to turn. After several attempts and some troubleshooting it was determined that there was something wrong with the rotor or the controller and it would need to be worked on. Some new start/run capacitors and light bulbs were ordered in anticipation of being needed.
Fast forward a long long time and sometime in March we started actually looking at the problem. We were able to find out of 4 rotors we had one that actually turned and the only problem it had was that had some ball bearings that had come lose and were bouncing around inside the rotor. We found out of 4 1/2 controllers, that the controller we were using in the rover was fine with the exception of needing a new light bulb. We replaced the light bulb with ease. The second controller we had needed some new bulbs and the start/run capacitor was bad. The capacitor was easy to replace but the light bulbs were a small problem. The bulbs we ordered were 12 volts yet the bulbs installed in this controller design used the 24v that was used for the rotor. With a little crafty rewiring to put the bulbs in series and we were done. The third controller just needed a new light bulb as well. The other controllers we had, one which had taken a lightning strike and the other that was just spare parts left were left alone for now.
First we opened up the rotor which would turn and were able to easily locate and replace the ball bearings. Then when we went to reassemble the bell housing we could not get everything to line up properly so that the brush on the potentiometer would set properly in the bell housing and would turn when the rotor turned. After several attempts and the day getting long we decided to abandon it for another day.
Fast forward to June 6th. We finally got back to looking at the rotors. We quickly identified that in order to put the rotor back together properly that we first had to turn the rotor to the left North stop. Then we turned the potentiometer just slightly off of its left stop. We then noticed that if you place the rotor so that the potentiometers brush points in the middle between the bottom housings screw holes then it would all line up. We did this after a few attempts and then figured it out. We then were able to put the top bell housing right down on top of the housing with easy and without pushing the potentiometer to the left or right. Success.. One rotor up and running perfectly.

The next one we decided to work on was the one that stopped turning that we were last using on the rover. We opened it up and did a visual inspection. We were not able to find any obvious problems with the stop contacts or any of the gears so we wired it up to the controller. Once connected we verified the brake solenoid worked fine and it appeared that the rotor was trying to turn. Further inspection of the gears more closely didn’t really reveal anything until Dad decided to stick a screwdriver up against the main gear off of the motor and push on it a little. As soon as he did that it was unstuck. What had happened was the grease in the rotor had got in there and hardened causing the rotor to cease. The rotor was then free but still had a little resistance. We decided to disasssemble the entire gear assembly. We cleaned each piece and then applied liberal amounts of the new grease we had purchased. Then fortunately we were able to reassemble all the gears and were able to easily turn them by hand. We quickly put up our paper towel shields to protect us from spraying grease and tested the rotor. The gears turned smoothly in both directions without any issues. We then reinstalled the main ring gear and tested the rotor in both directions against the stops. Upon finalizing that test,we then disconnected the cable as we could not put the bottom bell housing back on with it attached. We then did the same procedure as we did before and completely reassembled the rotor in one try. We then wired it back up and verified that the calibration was still good and the rotor turned properly. We also spent some time cleaning the potentiometer contacts which seems to cured our meter hesitation problems we were having.
I know Dad had done this kind of stuff in the past but I was very proud to successfully complete these repairs and in true ham style on the down cheap. We now still have 2 rotors to repair. One we believe just needs a new terminal strip but while we have it apart we will strip it down, clean it and grease it all up. Just to make sure its ready to go for the next 10 years or so. The last one may have had some damage to it so we aren’t really sure what is going on there until we open her up and peak inside.
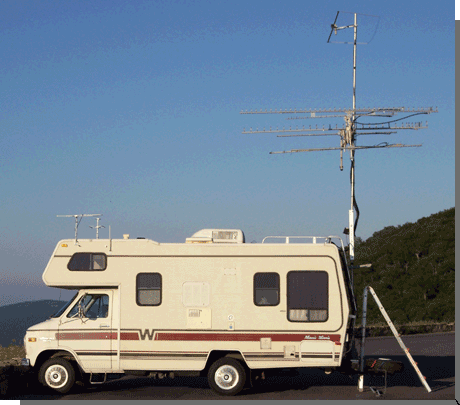
It has been quite a while so I think it is time for an update on the K3LFO/W3DIO Rover activities. As you know we have slowed down the intensity of our roves due to rover and equipment problems.
The current economic conditions have wreaked havoc with both of us. The company I was working for went bankrupt! Two months prior to the closing, I was laid off along with many other employees in an effort to survive. The result was that after 40 years of continuous employment I have been forced to retire on a less than adequate salary. Dave has been struggling with his new families needs as well. We have both decided to take a break from Roving for a while.
The status of the rover is not too bad. At least nothing a little money won’t cure. Besides the normal annual maintenance the engine has developed a squealing noise that comes and goes. I think it may be either a water pump bearing, an alternator bearing or perhaps power steering bearing. At any rate it doesn’t help to lure us into the Mountains and back woods with a pending failure. Also the engine driven air conditioning is no longer working. Last year we had the propane system worked on but it still doesn’t hold gas for very long. This affects the furnace, refrigerator, and stove.
Next is the status of the Radio systems. At the end of the September 2009 the main mast rotor froze up and wouldn’t turn. To work on it we have disconnected the upper mast and left it lying on the roof, removed the lower mast and the rotor. Out of 4 HAM-M / HAM-IV rotors ALL were in need of some repair. This work is still in process.
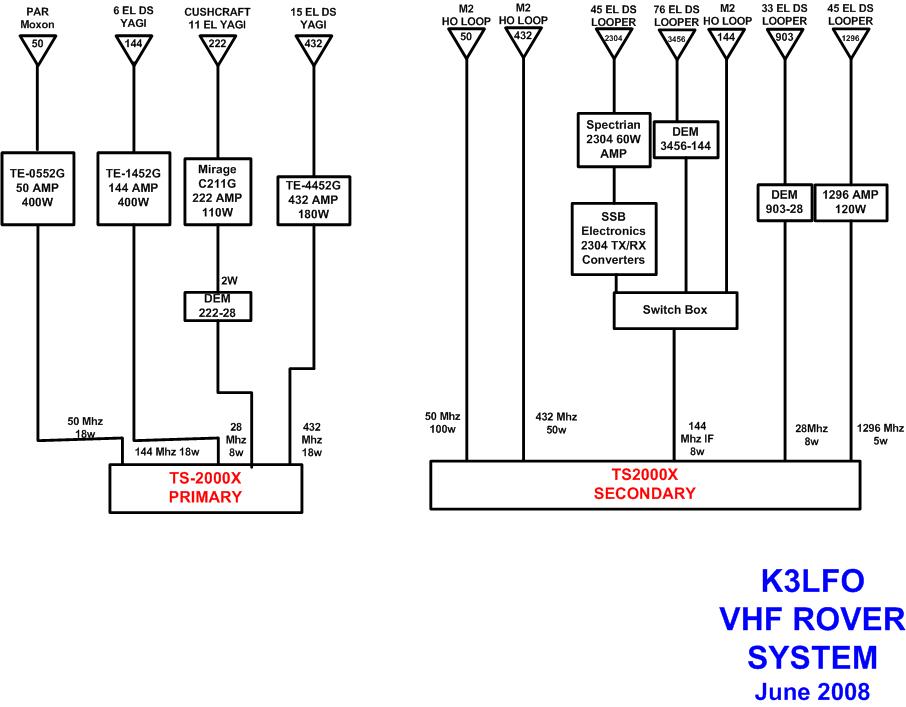
The DS222R rover antenna needs to be fixed and installed. It has a high SWR for some reason so we are still running the old 40 year old Cushcraft 11 element.
The 6 Meter PAR Moxon needs to be repaired after it was mangled several times in June and September.
The new 900 Mhz Amplifier will not put out more than 10 watts. I think I will need to purchase another Motorola Amp on ebay to fix this.
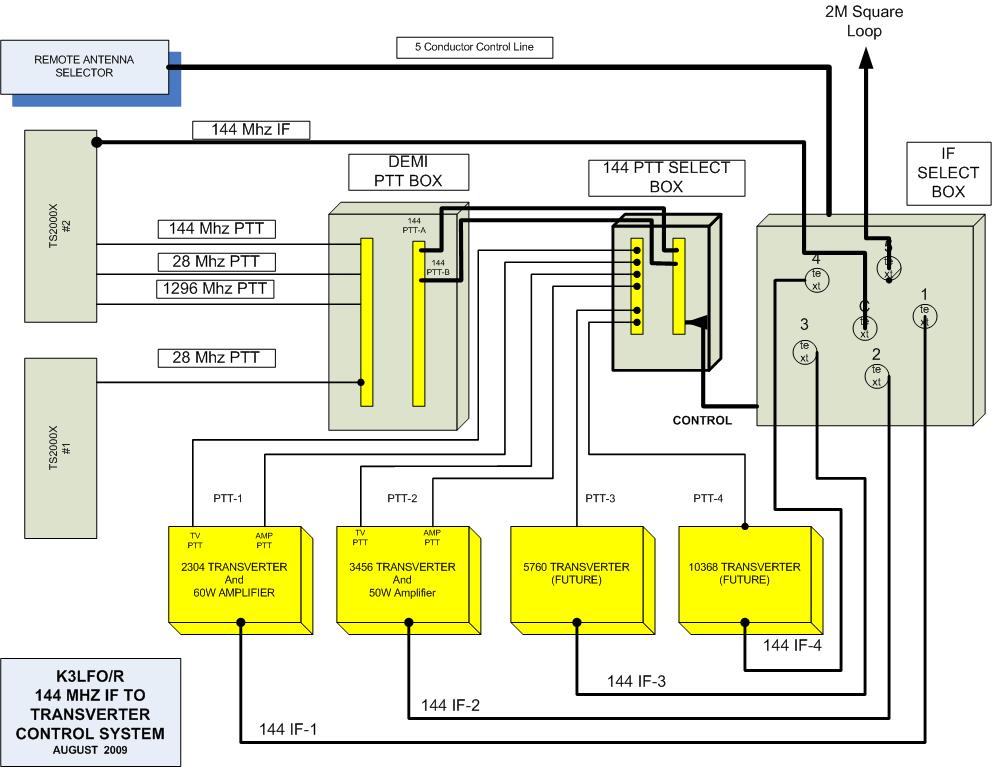
The new 3456 Amplifier needs to be built up with a heat sync, chassis and control board. Until then we only have 1 watt on 3456.
The new 2304 transverter and 50 watt amplifier need to be mated and installed. Until then we will run with the old 2304 system at 30 watts. It works just fine but takes up a bunch of space in the equipment closet.
The 2 TS2000’s and all switching systems are in good shape and fully operational.
The 6M system is fully operational with 400w output except for the antenna mentioned above.
The 2M system is fully operational with 400w output.
The 1.25m system is fully operational with 110w output.
The 70cm system is fully operational with 160w output.
The 33cm system is running barefoot with 30w output.
The 23cm system is fully operational with 150w output.
I hope to get some or most of the repairs and updates done by next September. For now I don’t see up going out for the June contest.
73 to all, Jim K3LFO
Old Rovers never die, they just change grid squares!73, Jim Erickson - K3LFO (FM19ml) jim@k3lfo.org
Dave Erickson - W3DIO (FN10gb) dave@w3dio.org

